The Caterpillar Electronic Technician (ET) is the industry‑standard diagnostic suite for Cat engines and equipment. This tutorial walks technicians through connecting to the ECM of C13, C15 and 3208 engines, reading live data, and performing advanced tests using Caterpillar Electronic Technician (ET) to keep trucks on the road faster.
What You Will Learn
- How to establish a reliable connection between the Cat Comm Adapter 3 and the engine ECM.
- How to navigate the main ET interface to view vehicle ID, engine serial number and module codes.
- How to read active and logged diagnostic codes, events, and sensor history.
- How to customize the status screen and capture min/max sensor values.
- How to access and modify configuration parameters such as engine rating and cruise‑control settings.
- How to run built‑in diagnostic tests, including injector solenoid, valve actuator, and cylinder cut‑out tests.
- How to use trainer mode for safe practice without affecting a live engine.
Step-by-Step Walkthrough
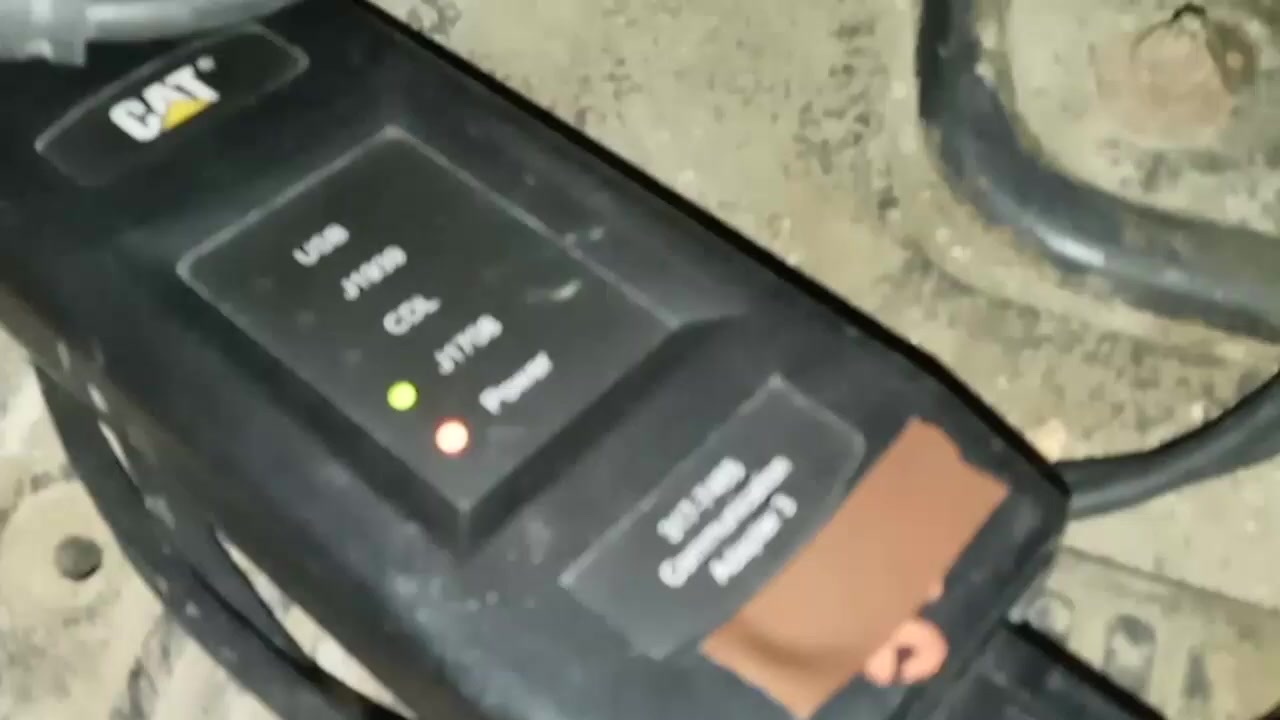
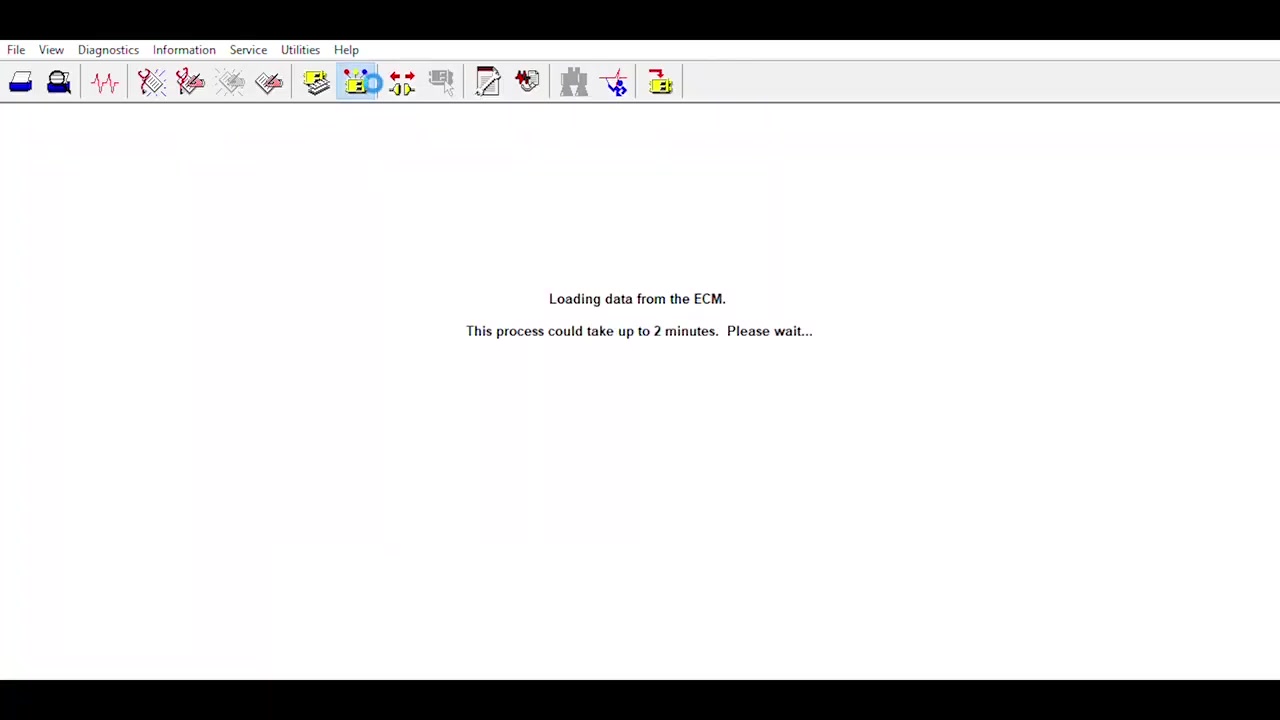
Begin by launching Caterpillar Electronic Technician (ET) on a Windows PC that has the dealer license installed. Connect the Cat Comm Adapter 3 to the laptop’s USB port and verify that the power LED on the adapter is illuminated. Plug the adapter’s 9‑pin cable into the ECM’s diagnostic port on the C13 (VIN KCB42545) or C15 (VIN SDP99999) engine. Once the physical link is established, click the Connect button in ET; the software will automatically detect the J1939 communication protocol and display a green “Connected” status.
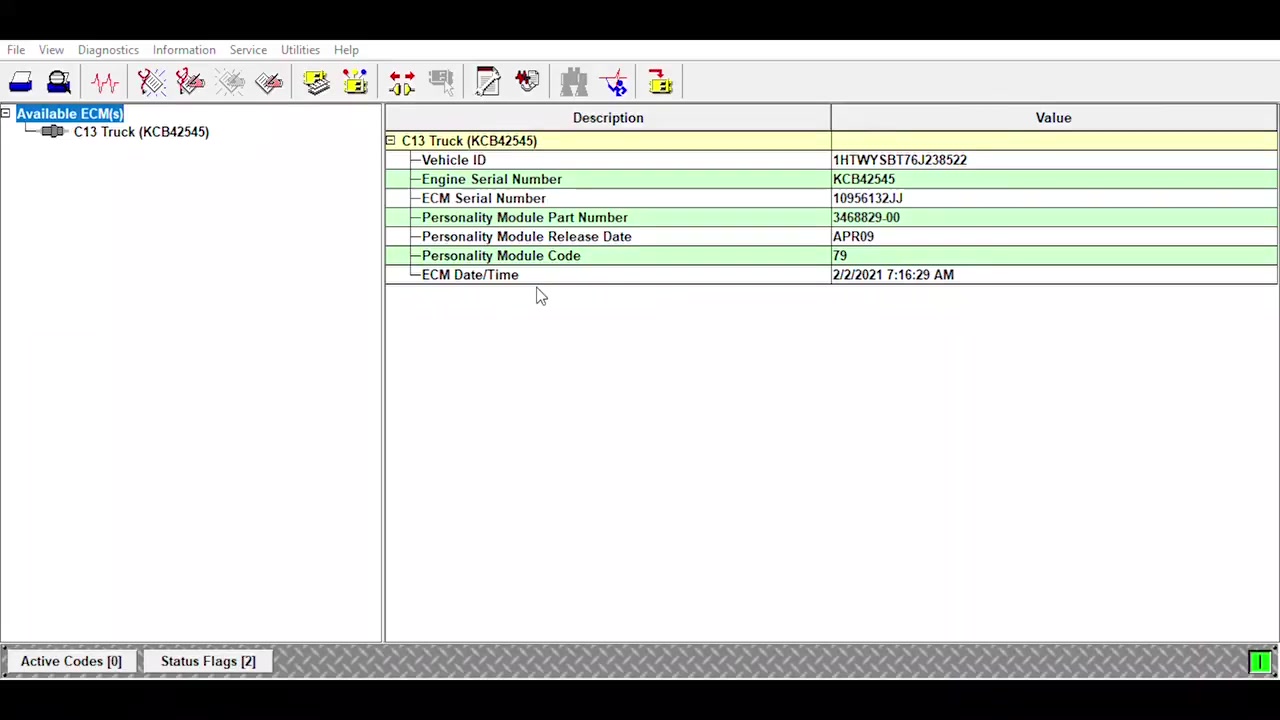
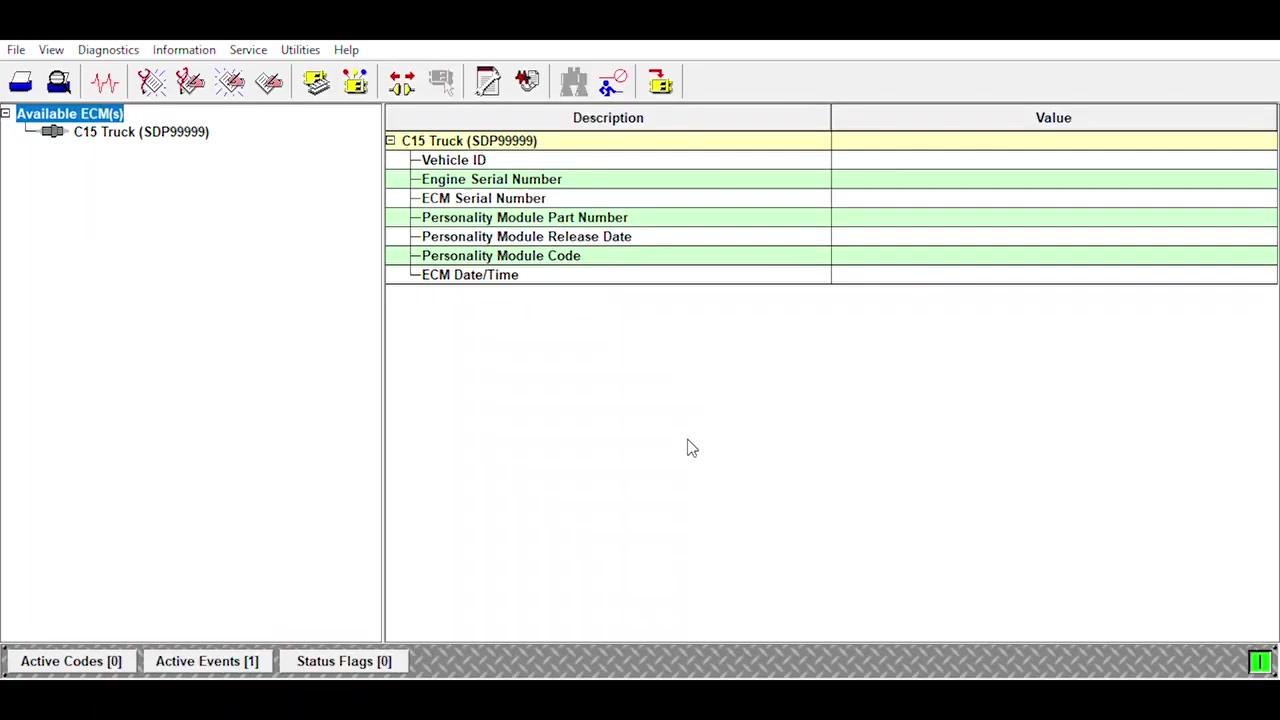
The first screen you will see is the **ECM Overview**. It lists the Vehicle ID, Engine Serial Number, Personality Module Part Number, Release Date, Module Code, and the ECM’s internal date/time. Take note of the date/time values; they can be corrected later if they drift.
Next, navigate to the **Diagnostic Codes** tab. Here you can toggle between **Active Codes** and **Logged Codes**. Active codes are flashing red and indicate current faults, while logged codes are stored in the ECM’s history buffer. Use the Export button to save a CSV file for later analysis.
Switch to the **Events** view to see **Active Events** and **Logged Events**. Events provide context such as “Engine Over‑speed” or “Low Oil Pressure” and are timestamped, which helps pinpoint when a fault occurred.
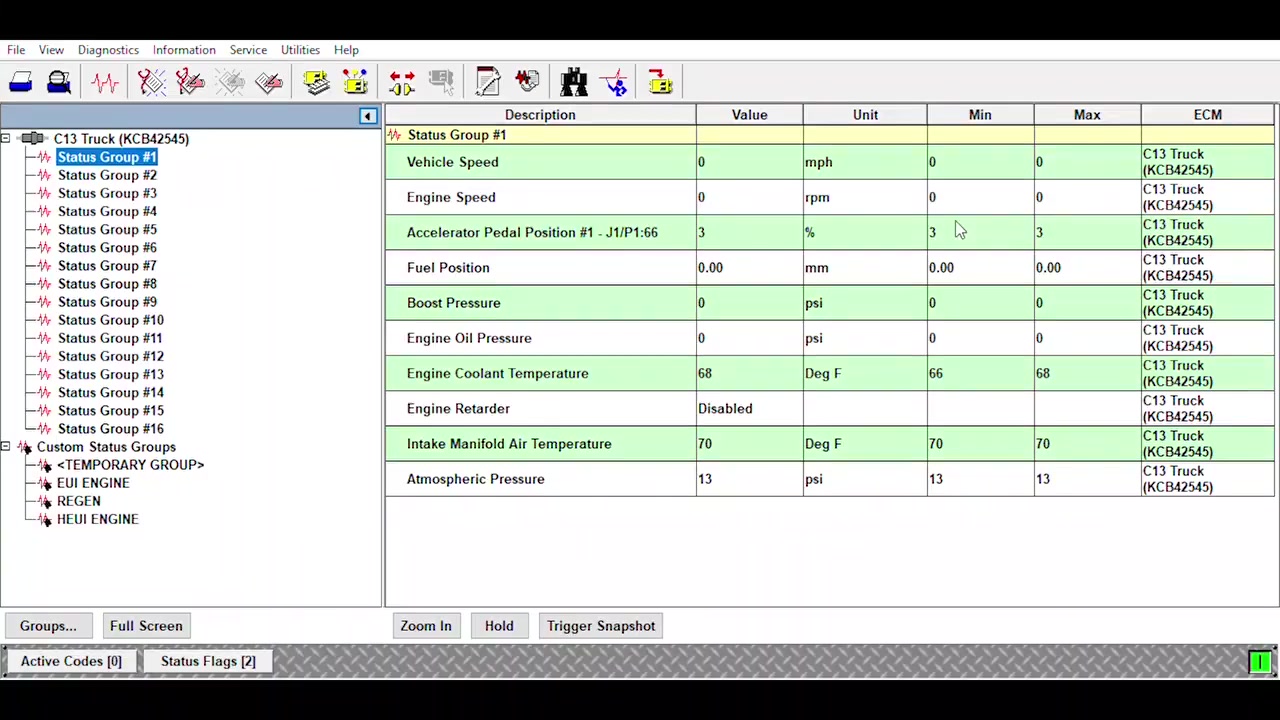
Open the **Status** screen to monitor live sensor readings. The default group shows engine speed, coolant temperature, oil pressure, and fuel rate. Click the Customize button to create a new group that includes additional inputs like PTO speed or exhaust gas temperature. While staying on the status screen, ET continuously records the minimum and maximum values for each sensor; these extrema remain visible even after you leave the screen, allowing quick trend spotting.
To adjust configuration parameters, select **Parameters** from the main menu. Categories include Engine Rating, Vehicle Speed, Cruise Control, Idle, PTO, Engine/Gear, Timer, Smart Idle, Engine Monitoring, Maintenance, Trip, Driver Reward, Input/Output Selections, Passwords, Data Link, and System Settings. For example, under **Engine Rating** you can change the rated horsepower or torque limits, but remember the pro tip about not altering FLS, FTS, or Personality Module Code unless you are a dealer performing a dyno test.
Changing the ECM date/time is straightforward: go to **ECM Settings → Date/Time**, adjust the fields, and click Apply**. This is useful when troubleshooting time‑related events or synchronizing data logs across multiple machines.
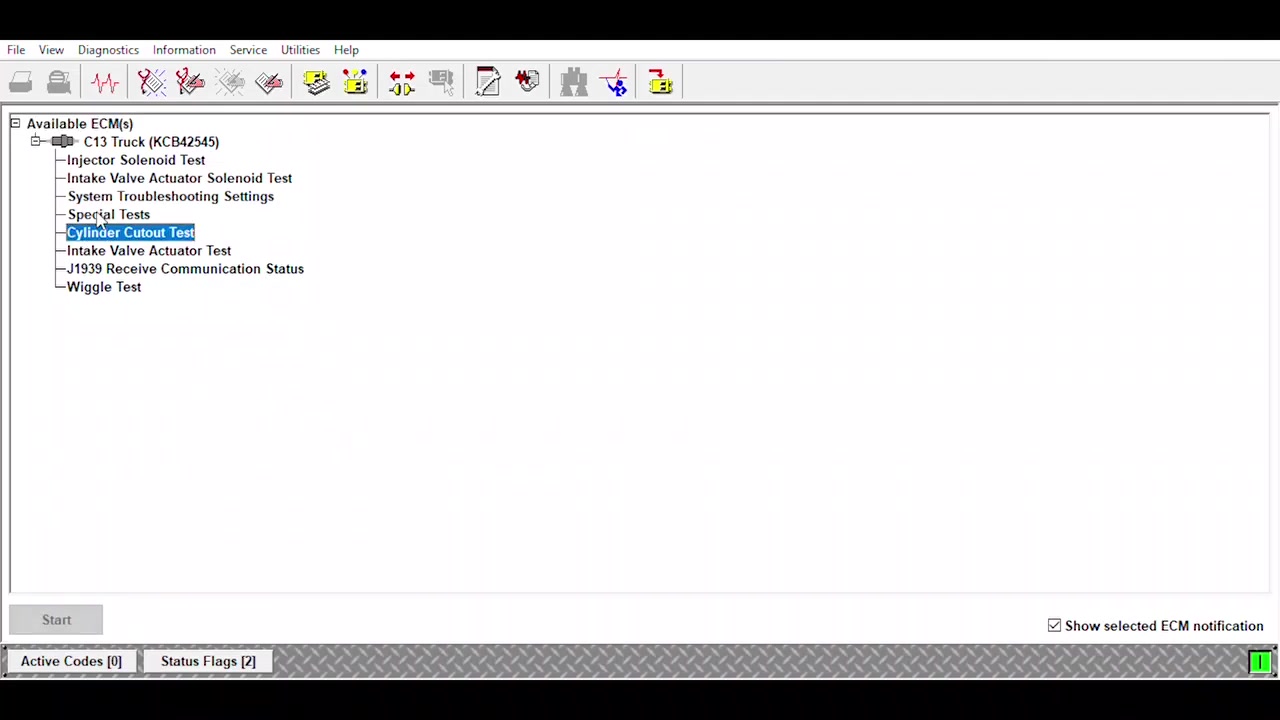
The **Diagnostic Tests** menu houses a suite of engine‑specific tests. Start with the **Injector Solenoid Test** to verify each injector’s pulse width and response time. Follow with the **Intake Valve Actuator Solenoid Test** to ensure proper valve timing. The **System Troubleshooting Settings** allow you to enable or disable specific sensors for isolated testing. Advanced options such as **Special Tests**, **Cylinder Cutout Test**, and **Wiggle Test** are available for in‑depth analysis of individual cylinders or actuator function.
For communication verification, run the **J1939 Receive Communication Status** test. If you encounter the “J1939 Device Not Responding” error, double‑check the adapter’s power LED, confirm the correct cable orientation, and verify that the engine’s J1939 network is powered.
The **Engine Air System Verification Test** checks for leaks, pressure drops, and correct sensor operation in the intake manifold. Use the **ARD Ignition Test** to validate the auxiliary relay driver circuit, especially after recent wiring work.
When calibrating fuel delivery, the **Injector Trim Calibration** routine lets you fine‑tune each injector’s fuel trim based on live load and speed data. Follow the on‑screen prompts, and ET will write the new trim values directly to the ECM.
If you are new to ET or need a safe environment for training, enable **Trainer Mode** from the **File → Options** menu. Trainer mode simulates engine responses without sending commands to the actual hardware, preventing accidental damage during practice runs.
Finally, after completing all tests and parameter changes, click **Save Configuration** to write the updates to the ECM. Disconnect the Comm Adapter, power down the engine, and perform a brief road test to confirm that all systems operate within normal parameters.
Review the **Summary Report** generated by ET; it consolidates code listings, test results, and parameter changes into a single PDF that can be attached to service orders.
Close Caterpillar Electronic Technician (ET) and archive the session logs for future reference.
Key Features of Caterpillar Electronic Technician (ET)
- Full J1939 and J1708 communication support for modern Cat engines.
- Real‑time sensor monitoring with automatic min/max capture.
- Comprehensive code library covering active, logged, and historical faults.
- Extensive parameter editing for engine rating, cruise control, PTO, and more.
- Built‑in diagnostic test suite including injector, valve actuator, and cylinder cutout tests.
- Trainer mode for risk‑free learning and skill development.
Compatible Vehicles and ECUs
Caterpillar Electronic Technician (ET) works with the following engines and their associated ECMs: C13 (VIN KCB42545), C15 (VIN SDP99999), and 3208 series engines. The software communicates via the standard 9‑pin J1939 connector and supports both dealer‑level and field‑service licenses.
Pro Tips
- Always use a Cat Comm Adapter 3; its dedicated power LED confirms a healthy link before launching ET.
- Newer Cat equipment primarily uses J1939; older models may require J1708 – select the correct protocol in the connection dialog.
- The status screen retains minimum and maximum sensor values as long as you remain on the screen, making it ideal for quick trend analysis.
- Avoid modifying FLS, FTS, or the Personality Module Code unless you are performing a calibrated power‑dyno test at a dealer facility.
- Leverage trainer mode to rehearse complex test sequences without risking engine damage.
Mastering Caterpillar Electronic Technician (ET) empowers technicians to diagnose, calibrate, and maintain Cat engines efficiently, reducing downtime and improving fleet reliability.
Frequently Asked Questions
What is Cat ET?
Cat ET is Caterpillar Electronic Technician software used by technicians and customers to communicate with their engine or equipment, view codes, sensor readings, and perform diagnostic tests.
Can anyone download ET?
Yes, anyone can download the ET software, but it requires a license to function. Different licenses determine the version of ET (e.g., dealer, customer, truck-only, military).
What hardware is needed for ET?
ET requires a Comm Adapter, such as the Cat Comm Adapter 3 or Nexiq products, and appropriate adapter cables (OBD2, 9-pin black, 9-pin green, 6-pin) to connect to the vehicle’s diagnostic port.
What are FLS and FTS?
FLS (Fuel Limit Setting) and FTS (Fuel Trim Setting) are parameters set at the factory on a dyno to optimize engine performance. They should not be changed by users unless specifically instructed by a dealer for a power dyno, as changing them will not necessarily result in more horsepower or better fuel economy.
How can I practice using ET without a real engine?
ET has a ‘Trainer’ mode that allows you to simulate connecting to various engines and machines, perform tests, and change parameters without affecting actual equipment. This is recommended for unfamiliar users.
Ready to use Caterpillar Electronic Technician (ET) in your workshop? Download it directly from firstdiag.com — instant delivery, no subscription needed.